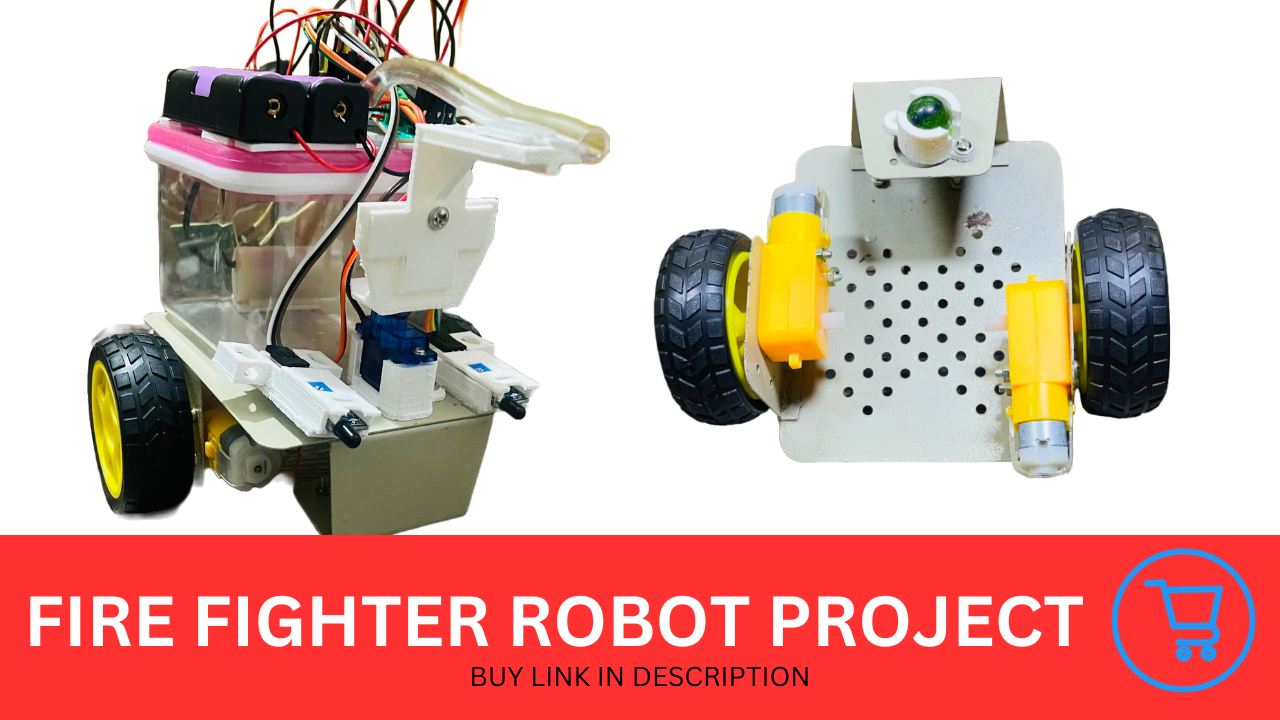
Build a fire-fighting robot that autonomously detects and extinguishes small fires using flame sensors, a water pump, and an Arduino-controlled motor system. Perfect for engineering and science projects, this tutorial guides you through assembling the robot, connecting the electronics, and coding it to respond to fire emergencies in real time.
Materials Needed:
- 2-wheeler chassis
- 2 BO motors
- Caster wheel
- Airtight transparent container for water
- Pipe
- Micro servo motor SG90
- 3D printed stand for pipe and servo motor mount
- 2 flame sensors with cases
- Arduino Uno
- L293D motor driver shield
- 7.4V 18650 Li-ion 2 battery holder
- On/off switch
- Mini water pump
- Connecting wires
Step 1: Assemble the Chassis
- Mount the BO Motors:
- Attach the BO motors to the 2-wheeler chassis. Secure them properly to ensure they are firmly in place.
- Connect the wheels to the BO motors.
- Attach the Caster Wheel:
- Fix the caster wheel at the rear end of the chassis for balance and support.
Step 2: Setup the Water Pump System
- Prepare the Water Container:
- Fill the airtight transparent container with water.
- Connect a pipe to the mini water pump’s output.
- Mount the Pipe and Servo:
- Use the 3D printed stand to mount the pipe and the micro servo motor SG90 on the chassis.
- Ensure the pipe is aligned properly with the water pump.
- Attach the Mini Water Pump:
- Secure the mini water pump on the chassis and connect it to the water container.
Step 3: Connect the Electronics

- Mount the L293D Motor Driver Shield:
- Place the L293D motor driver shield on the Arduino Uno.
- Connect the Motors:
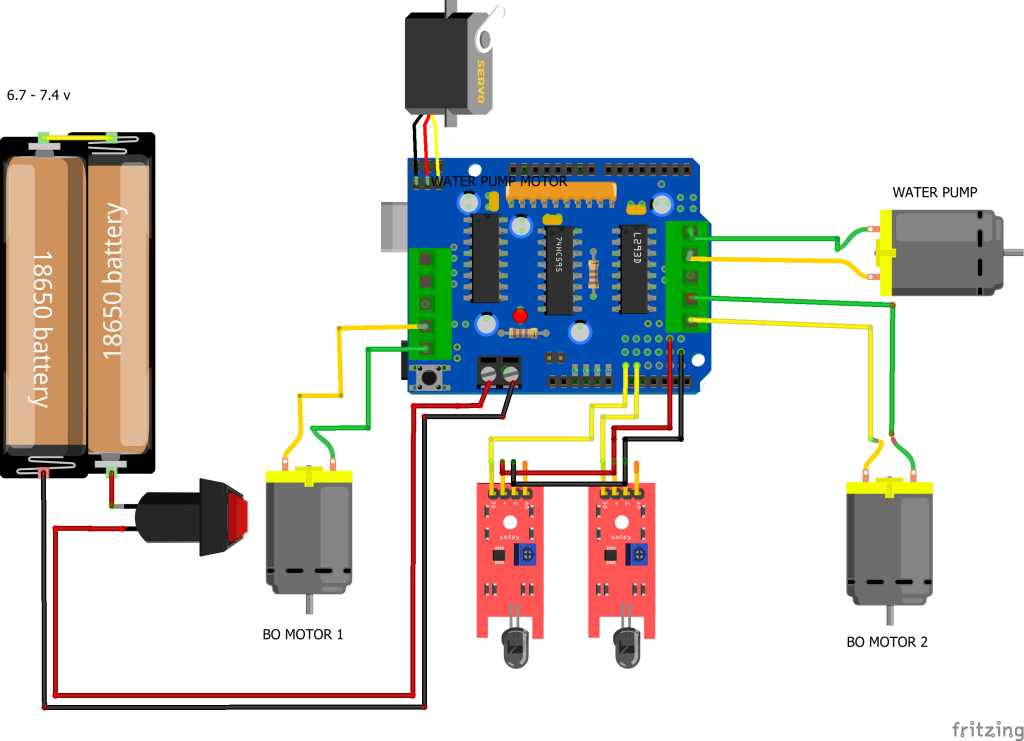
- Connect the BO motors to the motor driver shield’s M1 and M3 ports.
- Connect the Servo Motor:
- Attach the servo motor’s signal wire to pin 10 on the motor driver shield.
- Connect the Flame Sensors:
- Wire the two flame sensors to the A0 and A1 analog input pins on the motor driver shield.
- Connect the Water Pump:
- Attach the water pump to the M2 port on the motor driver shield.
- Power the System:
- Connect the 7.4V 18650 Li-ion 2 battery holder to the motor driver shield’s power input.
- Place the on/off switch between the motor shield and the 7.4V battery holder for power control.
Step 4: Coding the Robot
- Upload the Code to Arduino Uno:
- Write a sketch in the Arduino IDE to control the robot’s movement, detect flames, and activate the water pump.
- Code the flame sensors to detect a fire and move the robot towards the flame.
- Program the servo motor to position the pipe and spray water once the robot is near the fire.
#include <AFMotor.h>
#include <Servo.h>
Servo myservo;
int pos = 65;
AF_DCMotor motor1(1, MOTOR12_1KHZ);
AF_DCMotor motor2(2, MOTOR12_1KHZ);
A F_DCMotor motor3(3, MOTOR34_1KHZ);
AF_DCMotor motor4(4, MOTOR34_1KHZ);
void setup()
{
Serial.begin(9600);
myservo.attach(10);
myservo.write(90);
//Set initial speed of the motor & stop
motor1.setSpeed(200);
motor1.run(RELEASE);
motor3.setSpeed(200);
motor3.run(RELEASE);
motor2.setSpeed(200);
motor2.run(RELEASE);
motor4.setSpeed(200);
motor4.run(RELEASE);
}
void loop()
{
// digitalWrite (2, LOW);
// digitalWrite (2, HIGH);
// delay(1000);
// delay(1000);
int sensorReading = analogRead (A0);
int sensorReading2 = analogRead (A1);
// Map sensor value between range 0-3
int range = map (sensorReading, 0, 1024, 0, 3);
Serial.print(range);
Serial.println('/n');
if (range ==0){
Center();
}
if (range ==1 ){
}
if (range ==2 ){
}
int range2 = map (sensorReading2, 0, 1024, 0, 3);
if (range2 ==0){
Center();
}
if (range2 ==1 ){
}
if (range2 ==2 ){
}
}
void Center() {
// digitalWrite (2, LOW);
motor1.run(FORWARD);
motor1.setSpeed(200);
motor3.run(FORWARD);
motor3.setSpeed(200);
delay(1000);
motor3.run(RELEASE);
motor1.run(RELEASE);
delay(800);
motor2.run(FORWARD);
motor2.setSpeed(200);
delay(500);
for (pos = 50; pos <= 130; pos += 1) { // goes from 0 degrees to 180 degrees
// in steps of 1 degree
myservo.write(pos); // tell servo to go to position in variable 'pos'
delay(15); // waits 15 ms for the servo to reach the position
}
for (pos = 130; pos >= 50; pos -= 1) { // goes from 180 degrees to 0 degrees
myservo.write(pos); // tell servo to go to position in variable 'pos'
delay(15); // waits 15 ms for the servo to reach the position
}
delay(1000);
motor2.run(RELEASE);
delay(555);
myservo.write(90);
}- Upload and Test:
- Upload the code to the Arduino Uno and test the robot.
- Make adjustments to the code as needed for accurate flame detection and water spraying.
Buy – Fire Fighter Robot
Step 5: Final Testing and Adjustments
- Test in a Controlled Environment:
- Test the robot in a safe, controlled environment with a small flame (like a candle) to ensure it moves towards the flame and extinguishes it with water.
- Make Final Adjustments:
- Tweak the code, if necessary, to fine-tune the robot’s responsiveness and accuracy.
Step 6: Demonstration and Presentation
- Prepare a Demonstration:
- Practice demonstrating the robot in action, explaining its components, functionality, and code.
- Highlight its application in real-world fire-fighting scenarios.
- Present the Project:
- Present the robot as a science or engineering project, showcasing its design, assembly process, and performance.

Leave a Reply